Five real projects, photographed from the same spot before and after. No renders, no stock photos — this is our crew's work on decks that looked like yours does now.
By Master Pool DecksReal projects, photographed honestlyPhotos: our completed work
1. Plain gray concrete to two-tone desert tan
BeforeAfter
A structurally sound but plain gray deck. After prep and crack treatment, we applied a two-tone lace texture in desert tan — cooler underfoot, easier on the eyes, and finished with clean score lines.
What it took: surface prep and crack treatment, then base, texture, and color. A sound slab like this one is the straightforward case — nothing structural to fix, so the whole job is prep and finish. How cool deck works →
2. Spider-cracked slab to charcoal lace texture
BeforeAfter
Cracks ran across this whole deck. Every crack was routed and filled, drainage channels were preserved, and the surface was recoated in a charcoal lace that hides future hairlines better than a flat finish.
What it took: the cracks were the job. Routing and filling them properly is slower than coating over them, and it is the difference between a deck that looks right for a decade and one that telegraphs every old crack back through the new surface by the second summer. Our repair process →
3. Bare patio and stained deck, unified in light gray
BeforeAfter
Three different aged surfaces — patio, deck, and stepping pads — became one continuous light lace finish. This is the single-surface approach we recommend for compact yards.
What it took: matching texture and color across three slabs poured at different times, so the eye reads one surface instead of three patches. Light colors also run cooler underfoot than the bare concrete they replace. Patio resurfacing in Phoenix →
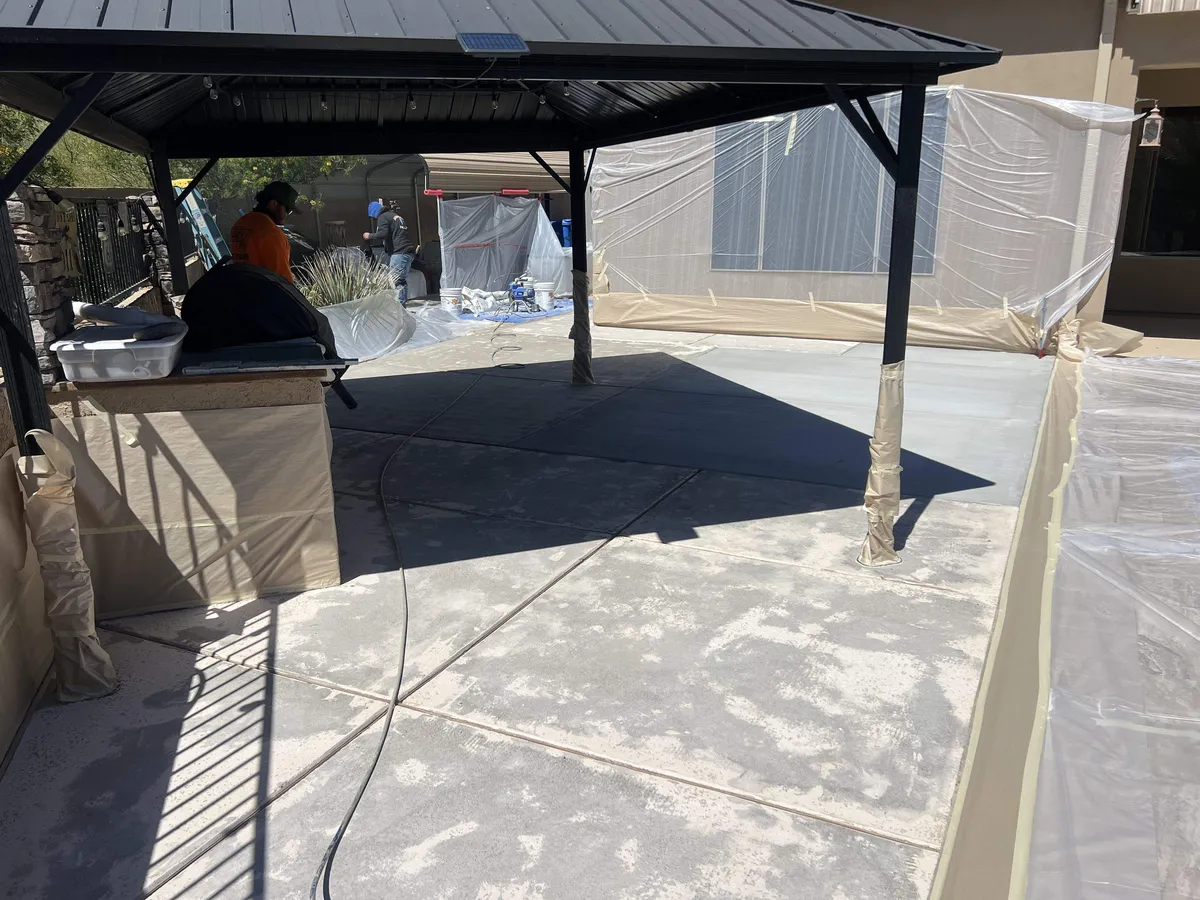
4. Masked and prepped to warm greige, edge to edge
BeforeAfter
Mid-project and finished: walls, gazebo posts, and the outdoor kitchen are masked before any material is sprayed. The finish runs edge to edge with crisp lines where coating meets stucco.
What it took: masking is most of day one, and it is what you are really paying for at the edges. Overspray on a wall or a gazebo post is permanent enough to be worth the extra hour of tape. Cool deck resurfacing in Phoenix →
5. Full renovation: demolished spa to rebuilt showpiece
BeforeAfter
The biggest lift on this page: spa walls rebuilt, new tile spillway, and the entire surround resurfaced in gray lace texture. Resurfacing scales from a one-day recoat to work like this.
What it took: several days rather than one, because the masonry had to be rebuilt and set before any coating went down. Not every deck needs this, and we say so when it does not. Pool deck resurfacing in Phoenix →
How to read any contractor’s before-and-after photos
Before-and-after galleries are the easiest thing in this trade to fake, and most homeowners have no way to tell. Here is what to look for, applied to this page as much as to anyone else’s:
Same spot, same framing. If the after shot is taken from a different angle or distance, you cannot actually compare the two. Every pair above is photographed from roughly the same position.
Edges in frame. The hard part of a coating job is where it meets coping, stucco, gravel, and drains. Photos cropped tight to the middle of a deck hide exactly the part that goes wrong.
Honest light. A wet-looking deck at golden hour flatters any surface. Look for at least some frames in flat daylight.
Mid-job frames, not just glamour shots. Masking and prep photos are unglamorous and hard to fake. Project 4 above is one of them.
Ask whose work it is. Manufacturer galleries and stock photos circulate widely in this industry. Every photo on this site is our own completed work.
What these projects have in common
The numbers behind the photos
Most of these transformations took 1–2 days of on-site work plus 3–7 days of cure. Every one started the same way: a free assessment of whether the existing concrete could be resurfaced at all. See the cost guide and resurface-vs-replace guide for how we decide.
Want photos like these of your own deck?
Send us a photo of your deck as it looks today for a preliminary read on what's possible — the free written estimate is measured on site.